
# 🌳序列化&重建二叉树
二叉树的序列化是指将二叉树转换成字符串的过程,反序列化则是将字符串还原成原始的二叉树结构。为什么要学习这一概念呢?因为在实际编程中,需要将数据在不同系统之间进行传输或存储,而二叉树的序列化与反序列化提供了一种高效的方式来实现这一目标。
# 🎯 应用场景
- 网络传输: 在网络传输中,数据通常是以字符串的形式进行传输,而二叉树的序列化可以方便地将二叉树转换成字符串,进行网络传输后再进行反序列化,恢复成原始的二叉树结构。
- 数据存储: 在数据存储中,二叉树的序列化可以将二叉树以字符串的形式存储在文件或数据库中,以便后续的读取和操作。
- 算法题解: 在一些算法题中,需要对二叉树进行序列化与反序列化操作,以便进行算法的求解。
# 🛠 序列化&反序列化
# 🔄先序
# 序列化
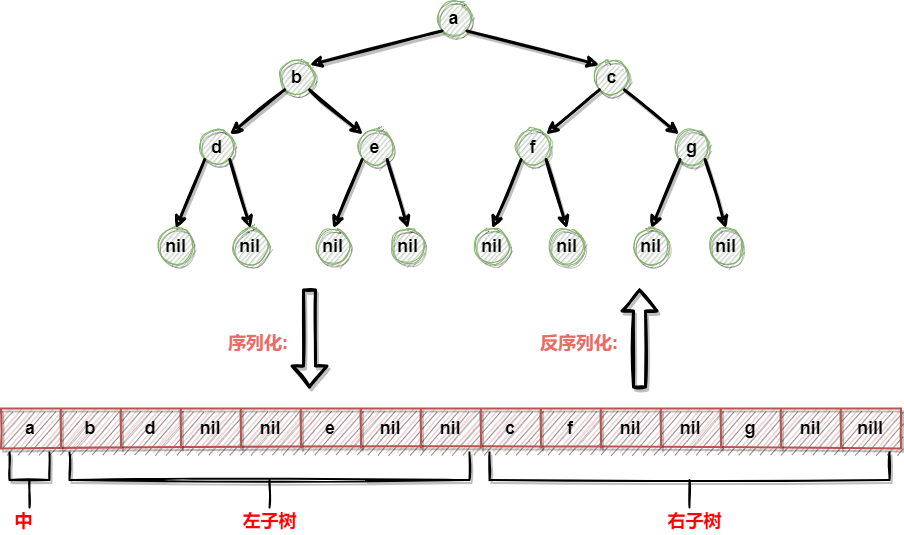
序列化流程:
使用字符串数组来记录序列化的内容
- 初始化一个字符串数组,采用指针传递
- 在先序遍历的基础上,修改先序遍历,将打印节点的值改为将节点的值放入数组
- 遍历完所有节点,将字符串数组返回,完成序列化
代码:
package binary_tree

type TreeNode struct {
	Val   string
	Left  *TreeNode
	Right *TreeNode
}


// PreSerialize --------------------------   先序列化   -----------------------------
func PreSerialize(root *TreeNode) []string {
	ans := make([]string, 0)
	PreSerializeProcess(root, &ans)
	return ans
}

func PreSerializeProcess(node *TreeNode, ans *[]string) {
	if node == nil {
		*ans = append(*ans, "nil")
		return
	}
	*ans = append(*ans, node.Val)
	PreSerializeProcess(node.Left, ans)
	PreSerializeProcess(node.Right, ans)
}
1
2
3
4
5
6
7
8
9
10
11
12
13
14
15
16
17
18
19
20
21
22
23
24
25
2
3
4
5
6
7
8
9
10
11
12
13
14
15
16
17
18
19
20
21
22
23
24
25
# 反序列化
反序列化流程:
序列化数组从左到右为头节点、左子树、右子树,构建树我们需要先构建头节点。
- 从左到右根据序列的值生成节点
- 每次生成节点时,需要消耗一个序列值
- 采用先序遍历的方式,生成节点。
代码:
func PreDeSerialize(serialize []string) *TreeNode {
	return PreDeSerializeProcess(&serialize)
}

func PreDeSerializeProcess(serialize *[]string) *TreeNode { // 根据序列,还原树结构
	if (*serialize)[0] == "nil" {
		// 如果是nil,返回空节点,并将序列中对应的"nil"值消耗,停止构建树结构
		*serialize = (*serialize)[1:]
		return nil
	}
	// 不为空时,将序列化中头结点取出,还原为树节点,并返回当前节点
	node := &TreeNode{Val: (*serialize)[0]}
	*serialize = (*serialize)[1:]
	// 使用序列化构建节点的左子树,只会消耗左子树的序列,
	node.Left = PreDeSerializeProcess(serialize)
	// 剩余的序列,都为右子树的序列,继续构建
	node.Right = PreDeSerializeProcess(serialize)
	// 构建完毕返回头结点
	return node
}
1
2
3
4
5
6
7
8
9
10
11
12
13
14
15
16
17
18
19
20
2
3
4
5
6
7
8
9
10
11
12
13
14
15
16
17
18
19
20
测试代码:
package binary_tree

import (
	"fmt"
	"testing"
)

func TestPreSerialize(t *testing.T)  {
	root := &TreeNode{Val: "a"}
	root.Left = &TreeNode{Val: "b"}
	root.Right = &TreeNode{Val: "c"}
	root.Left.Left = &TreeNode{Val: "d"}
	root.Left.Right = &TreeNode{Val: "e"}
	root.Right.Left = &TreeNode{Val: "f"}
	root.Right.Right = &TreeNode{Val: "g"}
	fmt.Println("原始树结构:")
	PrintTree(root)
	se := PreSerialize(root)
	fmt.Println("先序序列化:", se)
	newRoot := PreDeSerialize(se)
	fmt.Println("还原树结构:")
	PrintTree(newRoot)
}

/*  -----    输出打印    -----
	原始树结构:
			 ⬇g⬇
		 ⬇c⬇
			 ⬆f⬆
	 <a>
			 ⬇e⬇
		 ⬆b⬆
			 ⬆d⬆
	先序序列化: [a b d nil nil e nil nil c f nil nil g nil nil]
	还原树结构:
			 ⬇g⬇
		 ⬇c⬇
			 ⬆f⬆
	 <a>
			 ⬇e⬇
		 ⬆b⬆
			 ⬆d⬆
*/
1
2
3
4
5
6
7
8
9
10
11
12
13
14
15
16
17
18
19
20
21
22
23
24
25
26
27
28
29
30
31
32
33
34
35
36
37
38
39
40
41
42
43
2
3
4
5
6
7
8
9
10
11
12
13
14
15
16
17
18
19
20
21
22
23
24
25
26
27
28
29
30
31
32
33
34
35
36
37
38
39
40
41
42
43
# 🔄后序
# 序列化
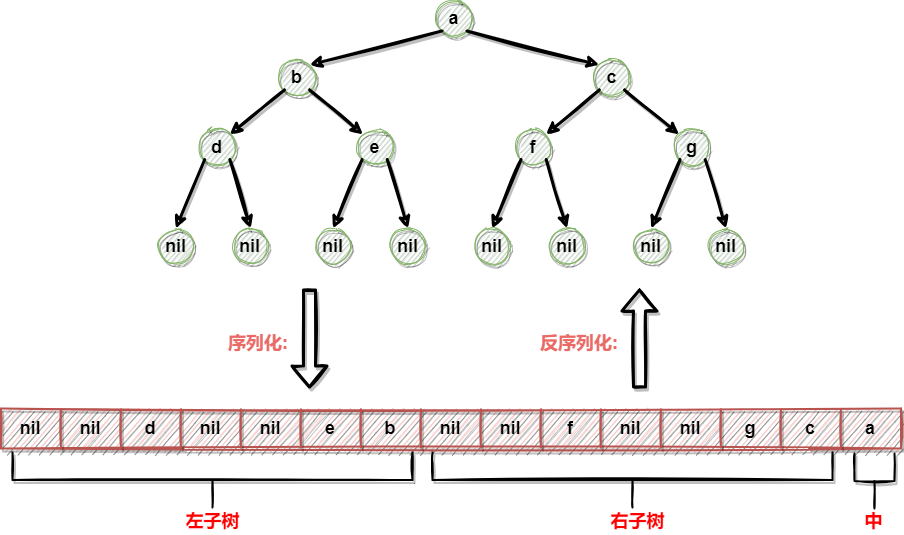
序列化流程:
使用字符串数组来记录序列化的内容
- 初始化一个字符串数组,采用指针传递
- 在后序遍历的基础上,修改后序遍历,将打印节点的值改为将节点的值放入数组
- 遍历完所有节点,将字符串数组返回,完成序列化
代码:
package binary_tree

// PosSerialize --------------------------   后序序列化   -----------------------------
func PosSerialize(root *TreeNode) []string {
	ans := make([]string, 0)
	PosSerializeProcess(root, &ans)
	return ans
}

func PosSerializeProcess(node *TreeNode, ans *[]string) {
	if node == nil {
		*ans = append(*ans, "nil")
		return
	}
	PosSerializeProcess(node.Left, ans)
	PosSerializeProcess(node.Right, ans)
	*ans = append(*ans, node.Val)
}
1
2
3
4
5
6
7
8
9
10
11
12
13
14
15
16
17
18
2
3
4
5
6
7
8
9
10
11
12
13
14
15
16
17
18
# 反序列化
反序列化流程:
序列化数组从左到右为左子树、右子树、头节点,与先序的序列化比较像,只是头节点再最后。我们才有从后往前反序列化。
- 从右到左根据序列的值生成节点
- 每次生成节点时,需要消耗一个序列值
- 采用先序遍历的方式,生成节点。
代码:
func PosDeSerialize(serialize []string) *TreeNode {
	return PosDeSerializeProcess(&serialize)
}

func PosDeSerializeProcess(serialize *[]string) *TreeNode { // 根据序列,还原树结构
	if (*serialize)[len(*serialize)-1] == "nil" {
        // 如果是nil,返回空节点,并将序列中对应的"nil"值消耗,停止构建树结构
		*serialize = (*serialize)[:len(*serialize)-1]
		return nil
	}
    // 不为空时,将序列化中头结点取出,还原为树节点,并返回当前节点(后序的序列化在序列化数组最后)
	node := &TreeNode{Val: (*serialize)[len(*serialize)-1]}
	*serialize = (*serialize)[:len(*serialize)-1]
    // 因为从后往前反序列化,需要先解析右子树
	node.Right = PosDeSerializeProcess(serialize)
    // 剩余的序列,都为左子树的序列,继续构建
	node.Left = PosDeSerializeProcess(serialize)
    // 构建完毕返回头结点
	return node
}
1
2
3
4
5
6
7
8
9
10
11
12
13
14
15
16
17
18
19
20
2
3
4
5
6
7
8
9
10
11
12
13
14
15
16
17
18
19
20
测试代码
package binary_tree

import (
	"fmt"
	"testing"
)

func TestPosSerialize(t *testing.T) {
	root := &TreeNode{Val: "a"}
	root.Left = &TreeNode{Val: "b"}
	root.Right = &TreeNode{Val: "c"}
	root.Left.Left = &TreeNode{Val: "d"}
	root.Left.Right = &TreeNode{Val: "e"}
	root.Right.Left = &TreeNode{Val: "f"}
	root.Right.Right = &TreeNode{Val: "g"}
	fmt.Println("原始树结构:")
	PrintTree(root)
	se := PosSerialize(root)
	fmt.Println("后序序列化:", se)
	newRoot := PosDeSerialize(se)
	fmt.Println("还原树结构:")
	PrintTree(newRoot)
}
/*  -----    输出打印    -----
	原始树结构:
			 ⬇g⬇
		 ⬇c⬇
			 ⬆f⬆
	 <a>
			 ⬇e⬇
		 ⬆b⬆
			 ⬆d⬆
	后序序列化: [nil nil d nil nil e b nil nil f nil nil g c a]
	还原树结构:
			 ⬇g⬇
		 ⬇c⬇
			 ⬆f⬆
	 <a>
			 ⬇e⬇
		 ⬆b⬆
			 ⬆d⬆
*/
1
2
3
4
5
6
7
8
9
10
11
12
13
14
15
16
17
18
19
20
21
22
23
24
25
26
27
28
29
30
31
32
33
34
35
36
37
38
39
40
41
42
2
3
4
5
6
7
8
9
10
11
12
13
14
15
16
17
18
19
20
21
22
23
24
25
26
27
28
29
30
31
32
33
34
35
36
37
38
39
40
41
42
# 🔄中序

中序遍历下不同的树结构会出现相同的序列,所以不采用中序遍历做序列化与反序列化
# 🔄层序
# 序列化
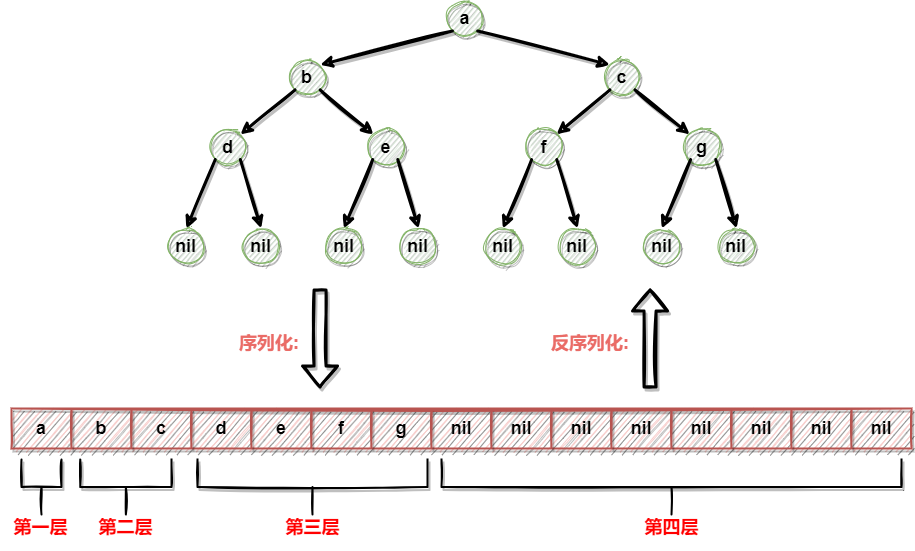
序列化流程:
使用字符串数组来记录序列化的内容
- 初始化一个字符串数组,采用指针传递
- 在层序遍历的基础上,修改层序遍历,将打印节点的值改为将节点的值放入数组
- 遍历完所有节点,将字符串数组返回,完成序列化
代码:
package binary_tree

import "container/list"

func LevelSerialize(root *TreeNode) []string {
	ans := make([]string, 0)
	if root == nil {
		return ans
	}

	queue := list.New()
	queue.PushFront(root)
	for queue.Len() > 0 {
		node := queue.Remove(queue.Back()).(*TreeNode)
		if node == nil { // 节点为空时,序列化为 "nil" 字符串
			ans = append(ans, "nil")
		} else {
			queue.PushFront(node.Left)
			queue.PushFront(node.Right)
			ans = append(ans, node.Val) // 节点不为空时,将节点的值序列化为字符串
		}
	}
	return ans
}
1
2
3
4
5
6
7
8
9
10
11
12
13
14
15
16
17
18
19
20
21
22
23
24
2
3
4
5
6
7
8
9
10
11
12
13
14
15
16
17
18
19
20
21
22
23
24
# 反序列化
反序列化流程:
序列化数组从左到右为各层从左到右的节点,我们直接采用层序遍历,解析序列即可。
- 从左到右根据序列的值生成节点
- 每次生成节点时,需要消耗一个序列值
- 采用层序遍历的方式,生成节点,注意遇到空节点时不要加入队列
代码:
func LevelDeSerialize(serialize []string) *TreeNode {
	if len(serialize) == 0 {
		return nil
	}
	root := GenerateNode(&serialize)
	queue := list.New()
	queue.PushFront(root)
	for queue.Len() > 0 {
		node := queue.Remove(queue.Back()).(*TreeNode)
		if node != nil {
			node.Left = GenerateNode(&serialize)
			node.Right = GenerateNode(&serialize)
		}
		if node != nil && node.Left != nil {
			queue.PushFront(node.Left)
		}
		if node != nil && node.Right != nil {
			queue.PushFront(node.Right)
		}
	}

	return root
}

func GenerateNode(serialize *[]string) *TreeNode {
	if len(*serialize) == 0 || (*serialize)[0] == "nil" {
		return nil
	}
	nodeVal := (*serialize)[0]
	*serialize = (*serialize)[1:]
	return &TreeNode{
		Val: nodeVal,
	}
}
1
2
3
4
5
6
7
8
9
10
11
12
13
14
15
16
17
18
19
20
21
22
23
24
25
26
27
28
29
30
31
32
33
34
2
3
4
5
6
7
8
9
10
11
12
13
14
15
16
17
18
19
20
21
22
23
24
25
26
27
28
29
30
31
32
33
34
测试代码:
package binary_tree

import (
	"fmt"
	"testing"
)

func TestLevelSerialize(t *testing.T) {
	root := &TreeNode{Val: "a"}
	root.Left = &TreeNode{Val: "b"}
	root.Right = &TreeNode{Val: "c"}
	root.Left.Left = &TreeNode{Val: "d"}
	root.Left.Right = &TreeNode{Val: "e"}
	root.Right.Left = &TreeNode{Val: "f"}
	root.Right.Right = &TreeNode{Val: "g"}
	fmt.Println("原始树结构:")
	PrintTree(root)
	se := LevelSerialize(root)
	fmt.Println("层序序列化:", se)
	newRoot := LevelDeSerialize(se)
	fmt.Println("还原树结构:")
	PrintTree(newRoot)
}
/*  -----    输出打印    -----
	原始树结构:
			 ⬇g⬇
		 ⬇c⬇
			 ⬆f⬆
	 <a>
			 ⬇e⬇
		 ⬆b⬆
			 ⬆d⬆
	层序序列化: [a b c d e f g nil nil nil nil nil nil nil nil]
	还原树结构:
			 ⬇g⬇
		 ⬇c⬇
			 ⬆f⬆
	 <a>
			 ⬇e⬇
		 ⬆b⬆
			 ⬆d⬆
*/
1
2
3
4
5
6
7
8
9
10
11
12
13
14
15
16
17
18
19
20
21
22
23
24
25
26
27
28
29
30
31
32
33
34
35
36
37
38
39
40
41
42
2
3
4
5
6
7
8
9
10
11
12
13
14
15
16
17
18
19
20
21
22
23
24
25
26
27
28
29
30
31
32
33
34
35
36
37
38
39
40
41
42
# 🌳 可视化
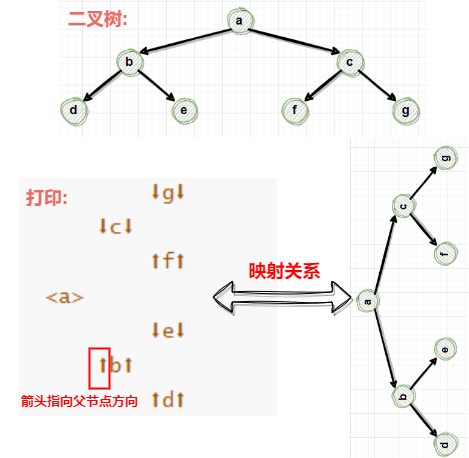
为了让我们直观的看见树结构,写一个辅助方法,接收参数为二叉树头节点,打印二叉树,映射关系如上图所示。
打印的结果对应着一颗逆时针旋转90°的二叉树。
package binary_tree

import (
	"fmt"
	"strings"
)

func  PrintTree(node *TreeNode) {
	if node == nil {
		return
	}
	InProcess(node, 0, 0)
}

// nodeType: 0: 根节点  1:左节点 2:右节点
func InProcess(node *TreeNode, level int, nodeType int) {
	if node == nil {
		return
	}
    // 先打印右子树
	InProcess(node.Right, level+1, 2)
    // 格式化头节点字符串,并打印
	nodeStr := FormatterFactory.CreateFormatter(FormatterFactory{}, node, nodeType).Format()
	fmt.Println(strings.Repeat("    ", level), nodeStr)
    // 打印左子树
	InProcess(node.Left, level+1, 1)
}

type Formatter interface {
	Format() string
}

type FormatterFactory struct {}

func (f FormatterFactory) CreateFormatter(node *TreeNode, nodeType int) Formatter {
	switch nodeType {
	case 0:
		return &RootNodeFormatter{Node: node}
	case 1:
		return &LeftNodeFormatter{Node: node}
	case 2:
		return &RightNodeFormatter{Node: node}
	}
	return nil
}

type RootNodeFormatter struct {
	Node *TreeNode
}

func (R *RootNodeFormatter) Format() string {
	return "<" + R.Node.Val + ">"
}

type LeftNodeFormatter struct {
	Node *TreeNode
}

func (l *LeftNodeFormatter) Format() string {
	return "⬆" + l.Node.Val + "⬆"
}

type RightNodeFormatter struct {
	Node *TreeNode
}

func (r *RightNodeFormatter) Format() string {
	return "⬇" + r.Node.Val + "⬇"
}
1
2
3
4
5
6
7
8
9
10
11
12
13
14
15
16
17
18
19
20
21
22
23
24
25
26
27
28
29
30
31
32
33
34
35
36
37
38
39
40
41
42
43
44
45
46
47
48
49
50
51
52
53
54
55
56
57
58
59
60
61
62
63
64
65
66
67
68
69
2
3
4
5
6
7
8
9
10
11
12
13
14
15
16
17
18
19
20
21
22
23
24
25
26
27
28
29
30
31
32
33
34
35
36
37
38
39
40
41
42
43
44
45
46
47
48
49
50
51
52
53
54
55
56
57
58
59
60
61
62
63
64
65
66
67
68
69
← 二叉树-7-最大宽度 二叉树-9-按层遍历 →